この記事は英語版のみ公開されています。
I’ve been looking for a simple note-taking application for a long time. Evernote has changed. Notion keeps adding features; it’s a bit too much for me, and I often find it slow to load. Recently, I’ve started feeling more comfortable building applications using Claude Code.
I chose Astro for both the frontend and backend because it keeps the project structure simple and doesn’t require a complex backend. For the interactive UI elements, I used React.
What I made
A simple Markdown editor using Dropbox as storage.

Log in with a Dropbox account to read/write files directly from Dropbox.
I added a switcher to toggle between the Preview and Code modes.
Tech Stack
Frontend
- Astro: routing and static page
- React: interactive components
- Emotion: styling for React components
Backend & Infrastructure
- Astro Endpoints: API routes
- Cloudflare Workers: Edge runtime
- Dropbox API: File storage
Project Structure
/
├── src/
│   ├── components/
│   │   └── Dashboard.tsx
│   ├── pages/                    # Astro
│   │   ├── index.astro           # display file list
│   │   ├── home.astro            # Login page
│   │   ├── [...path].astro       # display Markdown content
│   │   └── api/                  # Astro API endpoints
│   │       ├── auth
│   │       │    ├── callback.ts
│   │       │    └── dropbox.ts
│   │       └── files
│   │            ├── list.ts
│   │            ├── write.ts
│   │            └── read.ts
│   ├── middleware.ts
│   ├── styles/
│   └── types/
├── astro.config.mjs
└── package.json
Setup Dropbox
1. Create Dropbox App
Go to Dropbox App Console and click “Create app”.
After creating the app, the Apps/YOUR-APP-NAME folder will be created in your Dropbox.
2. Enable Permissions
Go to the “Permissions” tab and enable the following in the “Files and folders” category:
- files.metadata.write
- files.metadata.read
- files.content.write
- files.content.read
Click “Submit” at the bottom to save your changes.
3. Add Redirect URIs
In the “Settings” tab, and scroll down to the “OAuth 2” section.
Add your “Redirect URI”: e.g, http://localhost:4321/api/auth/callback.
Dropbox APIs
These APIs are called through the Astro endpoints.
- Authorization:
https://www.dropbox.com/oauth2/authorize?${params} - Token:
https://api.dropboxapi.com/oauth2/token - File list:
https://api.dropboxapi.com/2/files/list_folder - File content:
https://content.dropboxapi.com/2/files/download - Update file:
https://content.dropboxapi.com/2/files/upload
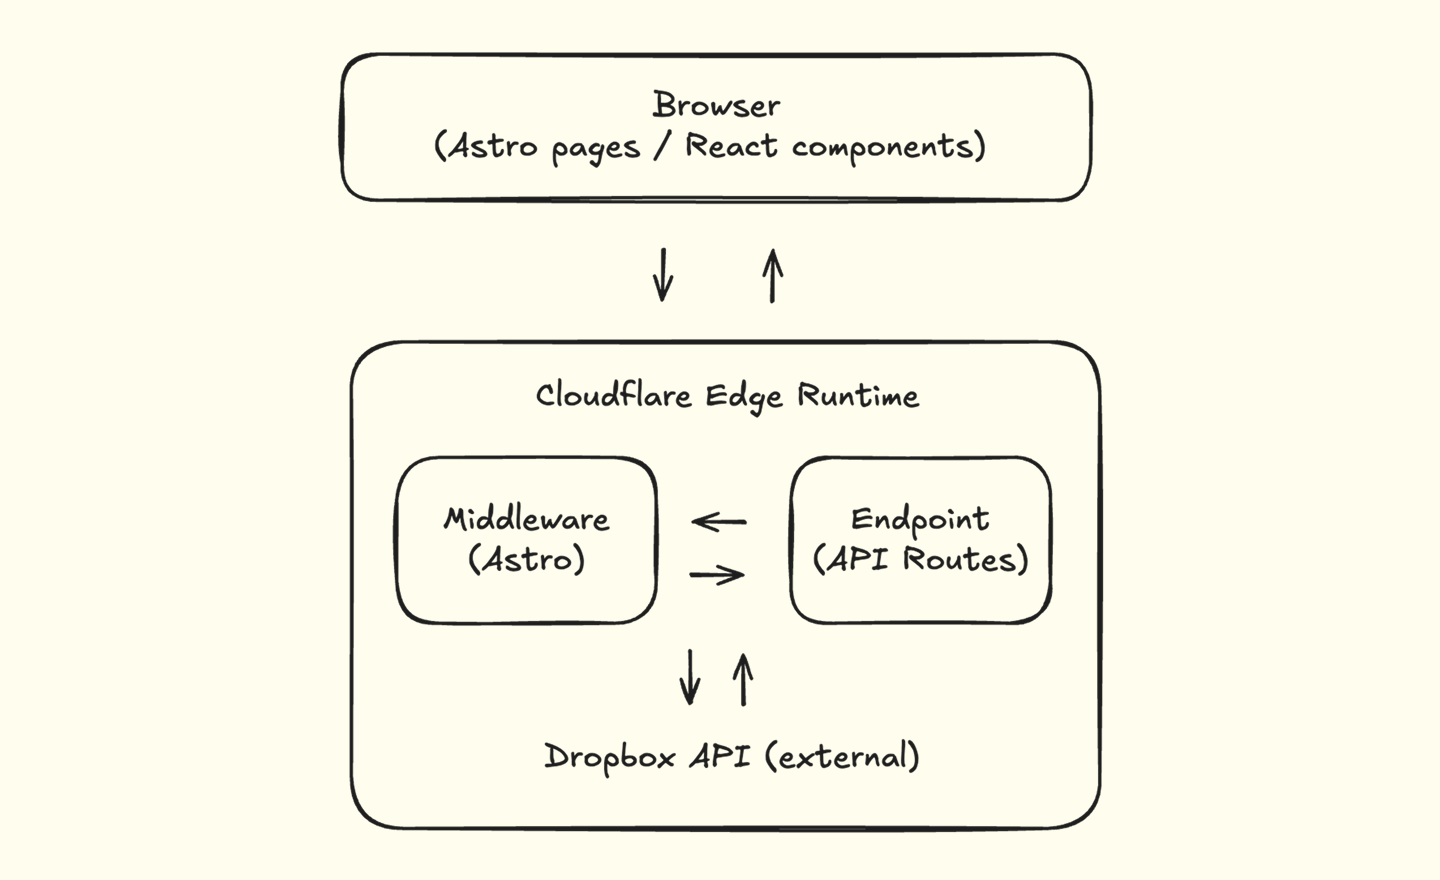
Architecture
The application architecture is simple:
Astro API Endpoint Example
Here’s how to get a file list from Dropbox.
Check authentication and import React component in the Astro page.
Access tokens are stored only in HttpOnly cookies and are never exposed to client-side JavaScript.
src/pages/index.astro:
---
export const prerender = false;

import { Dashboard } from "@/components/Dashboard";

/* check auth */
---

<Dashboard client:load />
In the React component, fetch files with the Astro endpoint.
src/components/Dashboard.tsx:
import { useEffect, useState } from "react";

export const Dashboard = () => {
  const [files, setFiles] = useState<FileItem[]>([]);
  const [error, setError] = useState<string | null>(null);

  useEffect(() => {
    fetchFiles();
  }, []);

  const fetchFiles = async () => {
    try {
      setError(null);

      const response = await fetch("/api/files/list");
      const data: ApiResponse<FileListResponse> = await response.json();

      ...
      /* error handling */
      ...

      setFiles(data.data.files);
    } catch (err) {
      /* error handling */
    }
  };

  return (
    <>
      {files.map((file) => (
        <Item key={file.path} file={file} />
      ))}
    </>
  );
};
In the Astro endpoint, fetch files with the Dropbox API.
And sort files, format data, and return to the frontend.
src/pages/api/files/list.ts:
export const prerender = false;

import type { APIRoute } from "astro";

import {
  createApiResponseHeaders,
  createSuccessResponse,
} from "@/lib/api-helpers";
import { getAuthenticatedToken } from "@/lib/auth";
import { getDropboxFolderPath, listMarkdownFiles } from "@/lib/dropbox";
import type { FileItem, FileListResponse } from "@/types";

export const GET: APIRoute = async ({ request }) => {
  const authPayload = await getAuthenticatedToken(request);

  if (!authPayload) {
    /* error handling */
  }

  try {
    const files = await listMarkdownFiles(
      getDropboxFolderPath(),
      authPayload.dropboxAccessToken
    );

    const fileItems: FileItem[] = files.map((file) => ({
      /* format data */
    }));

    return createSuccessResponse<FileListResponse>(
      { files: fileItems, hasMore: false },
      createApiResponseHeaders("GET, OPTIONS")
    );
  } catch (error) {
    /* error handling */
  }
};
Deploy on Cloudflare Pages
I encountered a few issues where things worked in development but failed in the production environment.
Environment Variables
In the Edge runtime, process.env is not always available at runtime.
So I needed to use the Astro getSecret() helper.
import { getSecret } from "astro:env/server";

const someKey = getSecret("YOUR_SECRET_KEY");
Using getSecret() ensures these variables are handled securely and never leak to the client side.
Dropbox SDK
The official Dropbox SDK didn’t work as expected due to Node.js runtime dependencies not available in the Edge environment.
I had to replace the SDK calls with standard fetch.
Before (using SDK):
const dbx = new Dropbox({ accessToken, fetch });

const response = await dbx.filesListFolder({
path: folderPath,
recursive: false,
});
After (using Fetch API):
const res = await fetch("https://api.dropboxapi.com/2/files/list_folder", {
  method: "POST",
  headers: {
    Authorization: `Bearer ${accessToken}`,
    "Content-Type": "application/json",
  },
  body: JSON.stringify({
    path: folderPath,
    ...
  }),
});
Note: In production, you may want to disable edge caching explicitly.